
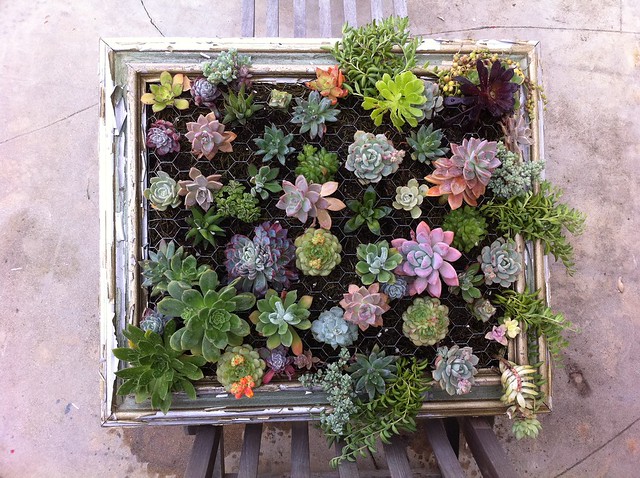
UPDATE 3.19.11: It's filling in...
I have a small pile of vintage frames collecting dust so I thought I'd use one to make a hanging succulent garden. I didn't have much luck finding one particular tutorial that best suited my needs so I gathered mental notes from a few sites, measured my frame and went off to the hardware store with little more than a concept of how it was all going to come together. I also brought Farilla along
My Supplies:
1- Vintage frame with a 16" x 20" interior opening
1- 20"x24" piece of 1" Chicken Wire
1- 9' long piece of 2"x"2"
1 - 22"x 26" piece of oak plywood for the backing
a bunch of nails (some 2 1/2 " & some 1")
1 spray can of clear satin water based outdoor Varathane Diamond Spar Urethane
~10 lbs of cactus soil
50+ succulent clippings
Tools:
Work Gloves
Wire cutters
Hammer
First, I applied about 4 coats of Spar Urethane varnish to the front and back of the frame. I let each coat dry completely before applying the next.
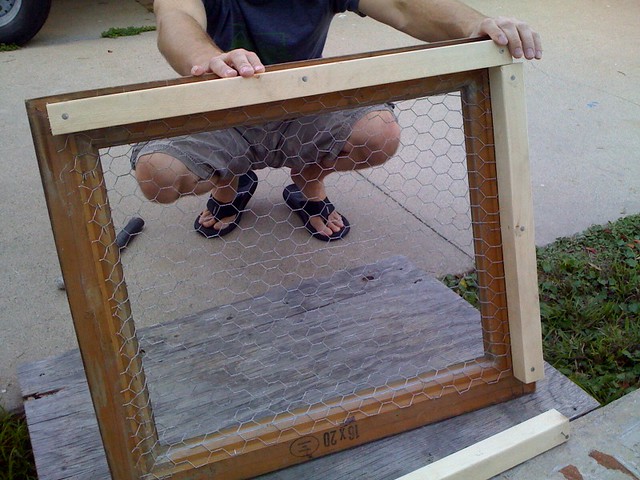
With the frame laying face down I pressed a large piece of 1" chicken wire down though the interior opening making sure it was flush with the front of the frame. Farilla then stapled the chicken wire into place on the back side of the frame. We removed all the excess wire with wire cutters. I highly recommend wearing work gloves while cutting the wire. Those edges are sharp.
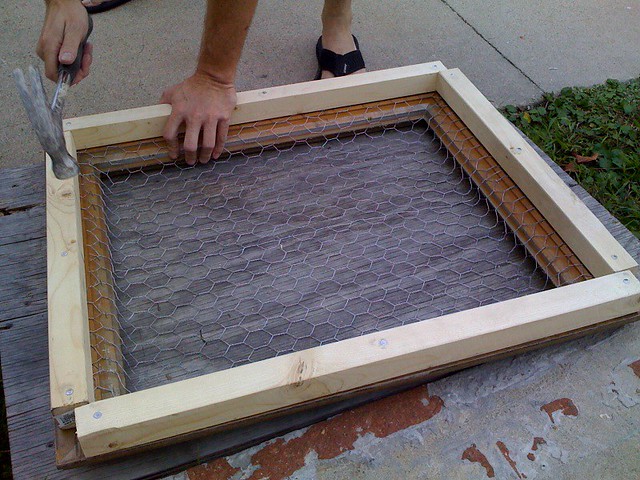
Next, we used the 2 1/2" nails and secured the four 2"x2"wood strips (cut down from the 9' long piece noted above) to the back of the frame like so...
In order to keep the cactus soil from falling through the wire I lined it with Spanish moss.
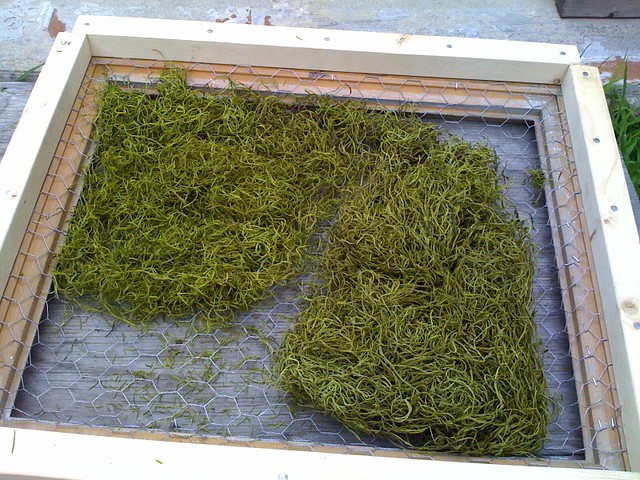
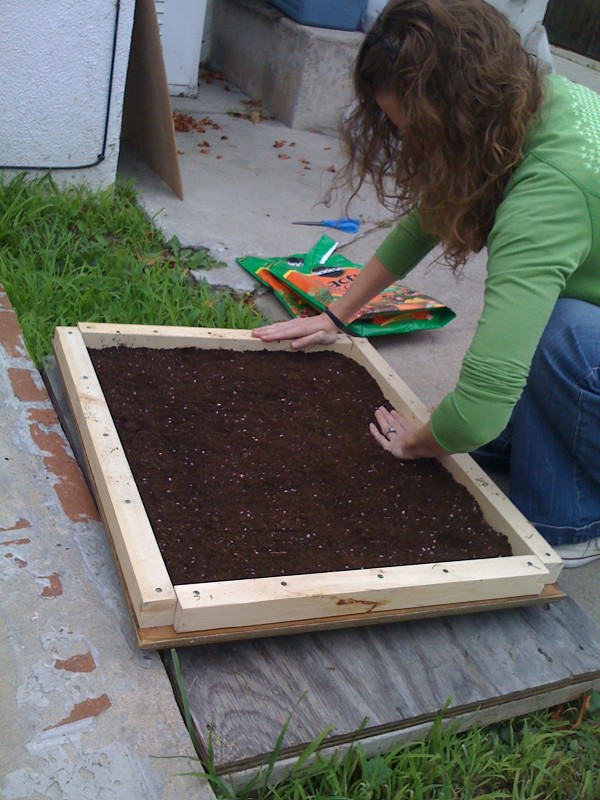
Once the wire was completely covered I filled the framing to the brim with the cactus soil.
Then, Farilla secured the plywood to the wood strips with the 1" nails.

As a precaution, I slid an extra piece of plywood under the front to help keep the soil/moss from squishing out through the wire mesh as we flipped the frame up-right. This thing is seriously heavy!

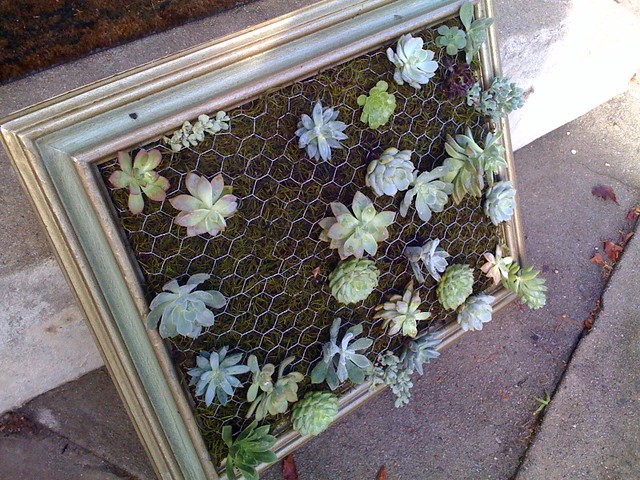
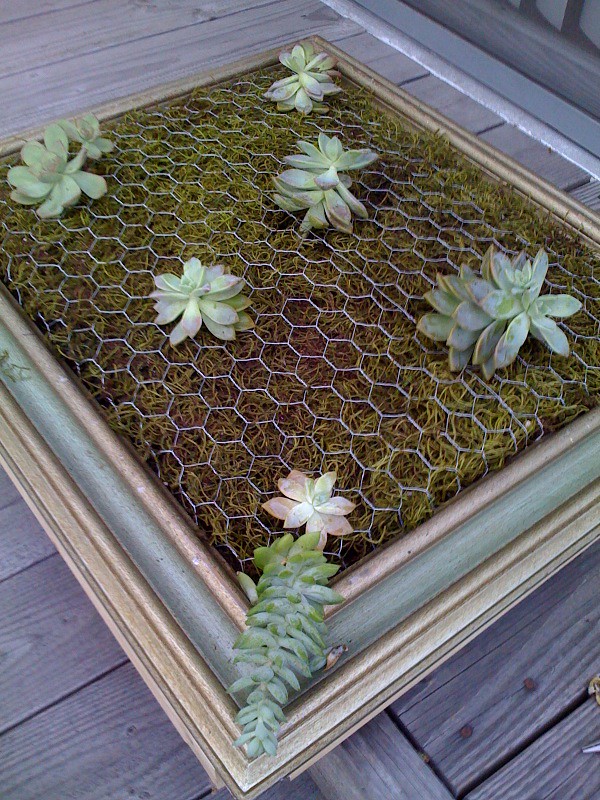
Once we had the frame facing right side up I began filling it with the succulent clippings I've been collecting during walks around our neighborhood.
I also picked up about 15 more succulents from the 99 cent store....the best deal in town.
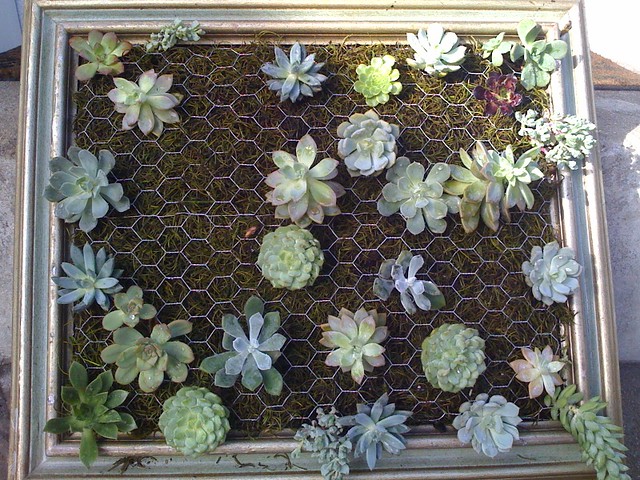
The ultimate goal is to fill the entire frame with plants. I'll be sure to post a photo once we get it all filled in. Due to the weight I don't think we'll be hanging our vertical garden but I'm convinced it will look just as lovely leaning up against the wall on our back patio. I couldn't be more pleased with the outcome thus far!
A couple things worth noting: Next time, rather than 2"x2" strips of wood I'll only use 1" thick strips. And then I'll use screws to attach those wood strips into the back of the frame (rather than nails). This thing is so heavy the screws will help make it more secure.
This is awesome! The next time you come over (hopefully soon) remind me to give you some succulents from our garden. Rad sister!
ReplyDeleteI absolutely love this project! It will look so perfect once it's covered in succulents! Bravissimi!
ReplyDeleteHey! I cam across this while viewing your 365 project. It is an awesome project. I am following you now. I intend to attempt this project. May need more pointers as I go along. Thanks for the inspiration.
ReplyDeleteGenelle
grannysbullfrogsandbutterflies@blogspot.com
Welcome Genelle! I can't recommend this project enough. The end result is crazy-beautiful which makes your efforts all the more rewarding. Please feel free to reach out with any questions!
ReplyDeleteGreat idea. Especially collecting succulent cuttings from the neighbourhood. Erm, you're nowhere near Manchester, England are you?
ReplyDelete@bigrednose- Ha! Nope, I'm in Los Angeles...where succulents practically grow like weeds.
ReplyDeleteHow did you attach the succulent clippings to the mesh?
DeleteHi Rick, The succulent roots are pushed through the wire mesh and into the soil below. I hope that helps.
DeleteBeautiful. I haven't seen so many colors in succulents. Great idea that is affordable and looks great. Thanks for sharing the idea and step by step process.
ReplyDeleteI know nothing about succulents other than like cacti they don't need watering. Could you post more details about how to plant the succulents in the frame once it is done?
ReplyDeleteTo plant the succulents I'll spray the root ball with the hose in order to wash away enough dirt so that the root ball will fit in between one of the holes of the chicken wire. Then I'll use my finger or spoon handle to make a hole in the dirt where I want to plant the succulent. Shove the roots in and pack the dirt in nice and tight all around...and there you have it! Be sure to let the roots take hold (a few weeks) before hanging it upright.
ReplyDeleteThis is Very cool...I might try a smaller version of this :-) thanks for sharing!
ReplyDeleteHi, this is a great tutorial. I've posted a summary in Spanish in my blog:
ReplyDeletehttp://armygurumi.blogspot.com/
Hope you'll enjoy it.
Congratulations!
Awesome!
ReplyDeleteThis is absolutely gorgeous! What a clever idea.
ReplyDeleteThank you, Wendy!
ReplyDeletewow! this is so awesome. I like that you did a step by step photo take. I am totally going to try out this idea. Thanks for being brilliant!
ReplyDeleteThanks, Weenie! Please share pics when you've completed your project! I'd love to see how it turns out.
DeleteWonderful tutorial on making these vertical gardens! Can't wait to see the frame filled out!
ReplyDeleteThanks for the reminder, Candy! I'll post an updated photo soon.
DeleteThat is totally awesome! I can't find many succulents/cacti at all in my area, let alone cuttings! Charmaine, Cincinnati OH
ReplyDeleteThanks, Charmaine! You might consider ordering succulent clippings in bulk online. Here's a seller on Etsy: http://www.etsy.com/shop/SucculentDESIGNS
DeleteWht about Lowe's or your local "nursery", Charmaine?
DeleteThis is wonderful! I have some frames that I have been keeping that off the wall pictures in them that you would buy in Walmart and I took the pictures out and kept the frame! I can't wait to show my husband what I found on your blog! Thank you so much!
Melissa
Thanks, Melissa! Good luck with your project. Please share pictures when it's complete!
DeleteOur local garden center (St Louis, MO) and Lowes had succulents this spring. Some of the succulents had 15 babies attached so for $3.99 I bought a pot with a mama plant and 15 babies. The local nursery had String of Pearls for $6.99 and I took it apart and got 7 small plants. Hen and Chicks works, too. I replied to a different question but it might help in finding succulents in the midwest.
DeleteWhat a great idea!!!!! I think I will make a few smaller ones to hang up. :-) I'm putting this on my many projects I wanna do list.
ReplyDeleteI saw this on another site, and I think your my new hero. What a beautiful little corner piece. Thanks for sharing!
ReplyDeleteThis is absolutely gorgeous! I just made my husband make two frames for me and right now it's ready for planting. I just need to head over to my grandmas for cuttings. Thanks so much for sharing! Can't wait to get started!
ReplyDeleteThis is a great tutorial. My sister-in-law just got her Master Gardeners certificate. I bet she would love to do this too!
ReplyDeleteThanks for all of the kind words, Friends! Good luck with your projects! It's such a rewarding DIY once your garden starts filling in.
ReplyDeletei think i will try this with herbs. KY is a little humid for succulents
ReplyDeleteDo you think you could use the chicken wire on both sides without the plywood back? That would cut down on some of the weight.
ReplyDeleteWithout the stability of the plywood back I would be a little concerned about the dirt falling out (especially during waterings). However, if you were to line the back chicken-wire with a heavy duty felt fabric maybe that would do the trick! Hmm, now you've got me thinking! :)
Deleteyou probably should have set up a basic system for irrigation & lined the wood w/plastic to prevent rotting. but then again it seems like it doesn't require too much watering, i think the wood would take a while to rot.
ReplyDeleteMaybe an Easel to support it would look neat.
ReplyDeleteOh my! That's a FANTASTIC idea! Thank you for the suggestion!
DeleteLove this. Wish we had a 99c store in Australia. The cheapest succulents we have are $4.50.
ReplyDeleteSo, this may be a stupid question, but does it fill in on its own? Like, did you just plan the beginning twenty or so and then the rest grew from those? Or did you plant originally, let the roots take hold for a couple weeks, hang it up for a while, take it down, plant some more, let the new plants take hold, and then hang it up again? I'm moving in a few days and am dying to try this!
ReplyDeleteThat's actually a great question! My framed succulent garden requires constant/continued maintenance. I filled in the entire frame with plants over the course of many months. The succulents will grow bigger and many will multiply but it can take a while. Since the plants can get very expensive I'd purchase a few here and there (or I'd get clippings from friends & neighbors) and then I'd add them to the frame over time. Some will die back, so I replace them. Some get too big, so I pull them out and replace them with a smaller plants. So to answer your question, yes, each time I plant a new succulent I have to take it down and give enough time for the roots to take hold before putting it back up.
DeleteHi. This is a great idea! Beautiful too! My question is, what about the succulants that grow from it's parent succulant? Would they not push against the chicken wire as they grow?
DeleteHi Melody! I'm glad you like this project! Yes, sometimes the pups from the parent plant will get caught under the chicken wire as they grow. I try to keep an eye out for these guys so I can movel them out from under the wire.
DeleteI was wondering if you could tell us how much watering and protection in the winter that it requires. I live in MS which is also in Zone 7.
ReplyDeleteI love this idea! I pinned it on my for the home decorating board so more people would find your tutorial.
If you would rather I didn't, just contact me via the addy posted on the footer of my website and I'll remove it.
Jan
Unique Baby Nursery Ideas
Hi Jan!
DeleteThank you for sharing my tutorial on Pinterest!
Here in Southern CA my succulent garden requires no protection during the winter months. Also during the winter I probably water it two times at most. During the summer I'll water it once ever 3-4 weeks. These plants are extremely hardy and require very little water. In fact over-watering will cause them to drop leaves quickly.
I did a Google search and it appears that there are some succulents that do better in your zone. Check out these links for some Zone 7 plant suggestions:
http://www.coldclimategardening.com/2009/04/11/hardy-succulents-book-review/
http://www.ehow.com/info_8295873_landscape-succulents-zone-7.html
http://definingyourhome.blogspot.com/2010/03/my-first-succulent-container-garden.html
I hope this helps!
Good luck!
Hi Luna, I couldn't find a contact email to message you directly, but wanted to invite you to share this project on Hometalk.com - the social hub for home improvement. Please email me at miriam@hometalk.com
ReplyDeleteThis is a wonderful project!
I love this! But hope you asked for the clippings .
ReplyDeletegreat idea! and I love this kind of flowers, they are always green :)
ReplyDeleteFabulous idea. Love succulents, and I can't wait to try this project. Thanks so much!!!!
ReplyDeleteVou fazer um pra mim.Que ideia legal !
ReplyDeleteLove this and am planning on doing one. One question: How do you water this? Spray bottle, pour from the top, soak it like a staghorn fern?
ReplyDeleteI keep my vertical garden outside so I just spray it with the garden hose on occasion. When it seems like it's in need of a good watering I lay it flat and soak it with water. I'll keep it down/flat for a good 24 hours before tilting it back up and allowing any excess water to drain.
DeleteHi,
DeleteAre those live spanish moss? Did you have any problem with fungus with the moss? I was thinking of using preserved moss since I can't get any live ones locally.
It's dried & preserved Spanish Moss. I haven't had any problems with fungus and I live in a fairly humid area near the ocean.
DeleteDo you have to use Spanish moss, or can you use something similar? I live in TX, where Spanish moss is very expensive and hard to find.
DeleteThanks! I love this idea and can't wait to try it!
Some burlap (or similar open weave fabric) might work but you'll have to use a sharp object to cut though it so you can get your roots planted in the dirt below.
DeleteThis is beautiful!!!! I love succulents, and I'm thinking of making a couple of small frames to hang in my kitchen. I'm no master planter...do you think these would do okay hanging inside? Will the soil need to be changed often? Thanks!!!
ReplyDeleteThese will do fine inside as long as there is plenty of indirect light available. I would recommend removing your frames from the wall for more thorough waterings. Be sure to allow your vertical gardens to dry out before re-hanging. I haven't changed the soil in mine but I do replace it as needed. Sometimes a little flows out during watering. I also recommend using a cactus and succulent fertilizer.
DeleteCan this work inside? Or does it need the air/sunshine outside?
ReplyDeleteThis can definitely work inside if you have a nice sunny wall. That said, succulents can get burned by constant and direct sunlight so I recommend a bright wall with lots of indirect light.
DeleteYou mentioned that you used cactus soil...how is this different from regular potting soil??
ReplyDeleteSucculent roots will quickly rot in soggy soil. Cactus soil is mixed with sand for quick drainage.
DeleteAh, good to know! Can I mix some sand in w/ my potting soil?? I haven't been able to find cactus soil specifically in my area.
ReplyDeleteYes! I did a quick google search on mixing your own cactus soil and there were tons of links that came up. Here's one site that seems pretty straight forward:
Deletehttp://www.wikihow.com/Mix-Your-Own-Cactus-and-Succulent-Soil
Good luck!
Wonderful post. Thank you for sharing.Shadow boxes would work great as a frame too. They are deeper. You just have to deal with sealing the back well. I am an artist and I bought a couple of thick open frames that turned out to be bad quality so they were just lying around. I plan to stick them on top of each other to get some depth for this project. Btw cece caldwell makes amazing paint for diy- for those who want to add more color to their creations!
ReplyDeleteThis is perfect for what I am looking for. I have a pretty established flowerbed of hen & chicks. However, my son got married last week, vintage theme, and they used succulents everywhere and gave small ones in tin pails as one of the guest favors. I wound up with 7 and wanted something special and with the vintage feel to plant them in. I have looked at a ton of upcycled planters and this one is favorite! BTW there are some bizarre things being used for planters!
ReplyDeleteWe tried this over the weekend. We are new to gardening and are currently loving succulents. The finished product is beautiful and I look forward to adding more clippings to our frame and seeing it fill out. Thank you!
ReplyDeleteFantastic! Feel free to come back and share a photo of your creation once it's filled in a bit more. I'd love to see it. Congrats!
Deletehello. this is an awesome project. but I was wondering can I use spaghnum moss instead of Spanish moss? thank you, Ken
ReplyDeleteThanks so much! Yes, spaghnum or any dried moss should work just fine to help keep the soil from falling through the chicken wire.
DeleteThanks so much for posting this! I have a question - you said in retrospect you'd make the frame depth 1" instead of 2". With only 1" deep of soil, is that to little for succulents to thrive? Less soil would certainly make this less heavy, but can succulents really grow in 1" of soil? Thank you!
ReplyDeleteThat's a great question! Yes, I believe there would be plenty of space for the succulents to grow if I had only used the 1" framing on the back. If you note in the 4th picture I made a comment about pushing the chicken wire flush with the front of the frame. In this project I didn't account for the additional inch or so of space I'd gain for the soil once this was done. It's actually quite deep with the 2" framing so I believe it would be just right had I used the 1" framing.
Deletehi every one im from nz i see succulents grow around the beach
ReplyDeleteHi great idear I'm going to try it with an old window I just got
ReplyDeleteI have this really funny movie in my head where you are running stealthily around neighborhoods dressed all in black with clippers and a bag taking clippings from succulent gardens. Beautiful job!
ReplyDeleteLol! Thanks!
DeleteBig Wow From Sinai ... Bless
ReplyDeleteWOW ! lov the update, came by from "takepart" 4 DIY ideas, thx <3 lydia
ReplyDeleteHi there, I know this is an old post, but I run into it today, and love the project! I want to apply it on a larger scale, on my fence to give me privacy while create art and inspiration. Could you let me know a bit more about "watering"? Do we spray it or actually water it with a hose/mist? I live in San Diego, so I don't believe I'll need to water it much yet, I want this project to last. Is drip system even recommended? What are your thoughts?
ReplyDeleteThank you so much,
Jacque
Hi Jacque! Because of the size, I can lay mine down flat so I'm able to give it a good soaking. The soil has become so compact and the plants so dense that the water just runs off when I spay it in the vertical position. I think a drip system for your set-up would be ideal! Good luck!
DeleteLove the project too! My concern is about watering it. What is the best method and won't the plywood get wet and rot?
ReplyDeleteWhat a beautiful idea. I am thinking of doing this on a smaller scale and possibly use on a table. Thank you for sharing
ReplyDelete